Construction - Starting With A Ruger 10-22
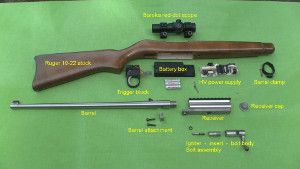 Here are the parts, all spread out
and labeled. If you click on the image (or any others in this site), you will get a larger version so details can
be seen. The sections below give details and design considerations of the various components.
The Chamber - a 'Reuseable' Cartridge
Chamber-loading weapons, where the powder and projectile are loaded into a chamber separate from the gun itself, go back to the 16th Century or earlier. Using a separately loaded chamber allows for a simple means of breech loading, and since the volume of the chamber can be exactly defined, excess powder cannot be added accidentally.
 All the initial
experiments were performed using a Ruger 10-22 barrel with the breech modified to accept a screw-in firing
chamber. The photo to the left shows the modified barrel, the chamber and the chamber screwed in place. This
arrangement allowed me to test a large number of variations of sizes, igniters and breech seals before commiting
to a final design. The chamber is designed to squeeze and 'fire-swage' a #4 buckshot pellet (0.240")
down to a 0.223" slug before it encounters the 0.222" barrel. The taper in the chamber checks the ball
at a fixed location, leaving a well-defined powder space between the ball and igniter.
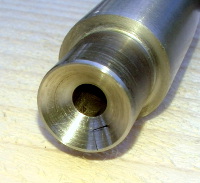 After about nine separate firing chamber
configurations were tested, a stainles steel Ruger 10-22 barrel was modified to mimic the dimensions of the best
performing chamber; this barrel was chosen because it is accurate, easily mountable and is widely available at
low cost. As can be seen, the extractor slot was filled in with a small piece of stainless steel and contoured to
match the 110 degree cone.
You Light My Fire - With Difficulty...

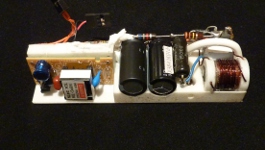 Igniting the smokeless powder with an electric
spark turned out to be far more difficult than I imagined. After a long series of experiments, which are shown on
their own web page and video here, an
augmented-arc power supply was developed, powered by three 'AAA' cells. When triggered, the power supply
provides a high-voltage, high-current arc between the tip of the igniter electrode and the wall of the chamber -
and through the powder, instantly igniting it.
The animated image on the left is from a slow-motion video looking from the muzzle down to the breech. In this
video, the ignition spark lasts for 20 milliseconds, although maximum power is delivered for ten milliseconds or
less.

 The igniter
insulator is made from a 0.250" rod of ZTA ceramic (Zirconium Toughened Alumina - also called 'ceramic
steel'), which has a compression strength of over 240,000 psi and is nearly as hard as a diamond. The rod was
ground down to 0.200" and swaged into a 0.250" 316 stainless steel threaded holder. The insulator
center was drilled using a 1.0mm diamond bit to accept a stainless steel or titanium electrode. The electrode tip
was expanded to fit in a small concavity in the insulator tip and was cemented in place with Loctite 680. The
assembly was designed to sustain a breech pressure of over 30,000 psi - far higher than is encountered in a
normal .22 cartridge. Looking at the other side of the assembly, you can see the hollow stainless steel conductor
(hypodermic tubing) and its high-voltage teflon insulating sheath. The igniter is threaded into the bolt so the
total length can be slightly adjusted as needed for different powder charges. The tip shown on the left has
sustained thousands of shots with no apparent degradation. If desired, one could use a standard-sized 0.200"
alumina rod, which is easier to drill and does not require much machining; a bit weaker than ZTA, it still has a
180,000 psi compression strength.
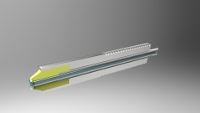
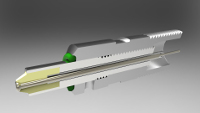 This is a cut-away diagram of the
igniter attached to the bolt insert. The hollow conductor coming from the igniter mates with a thin wire from the
bolt assembly to make a sliding contact system.
Keeping Up The Pressure
Another problem with using smokeless powder is not only the difficulty of igniting it, but also the difficulty in making it burn efficiently. In cartridge firearms, the primer showers the inside of the case with flame and burning primer fragments, and even then, there may be a substantial percentage of the powder which does not burn. It has been estimated that up to half of the powder charge in a .22 cartridge may not ignite. Using fast powders and tightly crimping the case helps overcome this, but this system does one better.
 The electrical ignition is weaker than that from a primer, but
pushing the ball down the swaging channel requires a great deal more pressure than blowing a bullet through a
crimp. The static force required to force the ball peaks at about 200 pounds, which translates to a chamber
pressure of about 5000 psi, resulting in a chamber temperature of at least 3,000 degrees. This high temperature
assists the ignition and rapid burning of most powder granules, and thus a relatively uniform muzzle
velocity.
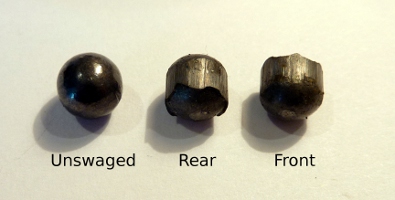
The image to the left shows the #4 buckshot as loaded; after firing, it is swaged as shown. To provide for
ignition and keep the pressure in, the bolt and receiver had to be specially designed.
Don't bolt for the exits

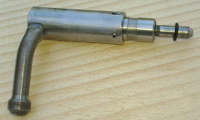 The the left image shows the three main bolt components as they will be assembled;
the one to the right shows them partially assembled. From left to right, the components are: the bolt body, the
bolt tip insert and the igniter. The threaded connection between the bolt body and insert allows precise
headspace adjustment, and the connection between the insert and igniter allows changing the firing chamber
volume. When assembled, small lock-screws retain the adjustments. The breech seal uses an O-ring, supported by
the igniter insert and bolt insert, and is completely protected from the hot powder gasses except for the
0.002" space between the igniter and the chamber wall. The O-ring seen here has sustained about 1000 firings
with no apparent damage or evidence of gas leakage.
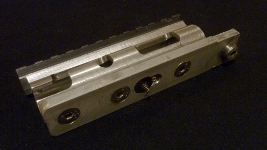
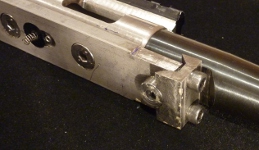 The receiver body was machined from a 1.25" bar of 303 stainless steel, which was
then mounted to a 416 high-strength stainless steel backplate, with a Picatinny rail bolted onto the top. A hole
drilled through the bottom of the assembly holds an insulated bushing with a central conductor, allowing the
power supply to connect to the igniter when the bolt is rotated closed. This also acts as a safety mechanism,
since the current cannot flow unless the bolt is fully engaged. The spring extending from the insulator connects
the inner conductor to the underlying power supply. The barrel is mated to the receiver using a clamp similar to
that used in the 10-22 rifle and is held in place by two high-strength bolts.
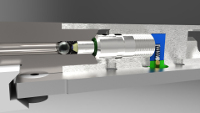 The body of the bolt has a central conductor connecting the
igniter to the power supply when the ball-bearing contact on the side of the bolt is aligned with the conductor
in the receiver. The igniter's arc requires a starting pulse of almost 10,000 volts, so the entire conductor
path needs to be well-insulated, with at least a 1/4" space between any conductor to any ground point.
Inside the bolt tip, where these clearances are not available, the conductors are covered with a high-voltage
insulating sheath.
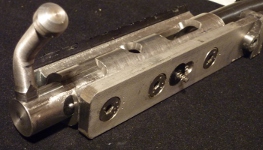 Next, the bolt is slipped into place - remembering to
add the tiny ball bearing contact. Slipping on the end cap completes the reciever, which is then dropped into the
stock and held in place with the same screws and clamp used in the 10-22. The receiver contacts are automatically
aligned with the power supply by the fit of the receiver in the stock.
Trigger-Happy
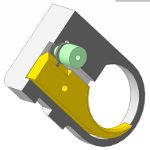
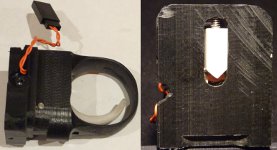 The trigger assembly is in a separate
plastic block which slips into place and is anchored by the body of the power supply. This version of the trigger
is a simple crossbar contactor as seen here. The crossbar is held off the contacts by a glob of silicone acting
as a soft spring, and the trigger take-up can be adjusted with the small screw. When the crossbar just touches
the contacts, a small voltage is sent to the power supply, instantly firing the rifle. The trigger has a good
feel and has absolutely no over-travel. Alternate designs using a force sensor rather than a contact are also
possible.
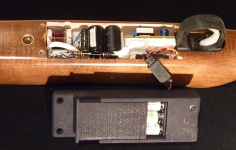
 The power supply slips into a widened area in the stock where the
original 10-22 magazine would have gone. The battery pack holds three rechargeable AAA cells and is mounted to
the bottom of the stock, covering the power supply. There is a power switch on the side of the battery pack,
which can also act as a safety. In normal use, the switch is turned on and left on; a LED indicator shows when
the gun is 'live'. Power is conducted to the receiver through two spring contacts. The 'hot
contact' is in a well in the center of the power supply back which is touched by the small spring coming from
the insulated receiver connector. The ground connection is from the small spring at the side which touches the
receiver back plate.
Performance
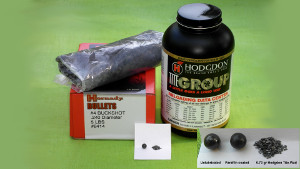 The load for this rifle is a single ball of #4
buckshot which has been given a light coating of paraffin wax or Alox. The coating is thin and somewhat
inadequate as a lubricant, but it does reduce the swaging pressure and improves accuracy. Most fast-burning
smokeless pistol powders will work, but so far Hodgdon's 'Tite-Group' seems to work best. I have
tried unsuccessfully to locate any of the powders used in commercial .22 cartridges, and if any readers know what
they are or where they may be obtained, please
let me know.
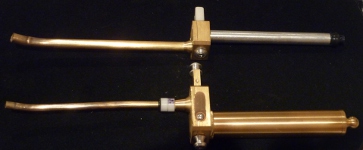
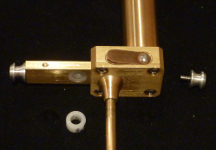 To make loading easier, two dispensers were
fabricated, one to drop a ball into the chamber and one to add a precise amount of powder. The ball dispenser
holds 16 lubricated #4 buckshot which are dropped one at a time from the tube when the slide is pressed. The
powder dispenser slide has replaceable inserts which drop varying loads, in this case 0.73 and 1.15 grains.
This rifle has MOA accuracy
Hmmm - I bet you thought I meant "Minute of Angle" - which is pretty darned accurate. Hey - buckshot is not what anyone would consider a 'precision munition' - so - in this case. 'MOA' means "marginal or adequate' - depending upon what you want to do. If you want put a scope on it to shoot squirrels at 50 yards, the gun falls into the 'M' category, but if you want to use iron or red-dot sights and bang away at cans, gongs or whatever, it works just fine. Shooting offhand, I can almost always hit a 1" steel swinger at 50 feet or a can at 40 yards, but I wouldn't risk just wounding a poor squirrel at more than 25 yards.
The table below shows the performance with the two loads tested. Note the accuracy is given as CEP, or 'Circular Error Probable' at 25 yards, my usual shooting distance for this rifle. CEP, discussed here, is the standard used by the military and is a more meaningful measure than 'group size' as it is independant of the number of shots taken.
| Charge | Muzzle Velocity | Energy | CEP |
|---|---|---|---|
| 0.73 gr | 955 fps | 41.9 fpe | 0.9" |
| 1.15 | 1420 fps | 92.7 fpe | 1.2" |
As could be expected from the light projectile weight, the muzzle energy is about that of a .22 short for the higher charge and acts like a CB-cap with a lower charge. I find the 0.73 grain charge to be perfect for backyard plinking; you don't have to have a lot of power to 'kill' a can, but it has enough 'oomph' to knock them around and to clang a heavier gong or swinger out to 50 yards. The real advantage is the sound - which is less than most .22 airguns - and the poor ballistic performance of the pellet, which only travels about as far as it would from a shotgun. At 200 yards it is traveling less than 300 fps, and in another 100 yards it is on the ground. With its minimal noise and powder fumes, it can even be comfortably shot inside a house with a newspaper bale or small steel backstop. However - it is still a lethal weapon and should be handled accordingly.
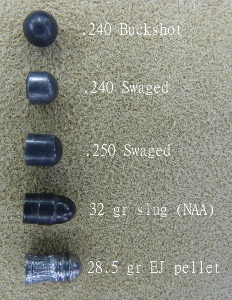
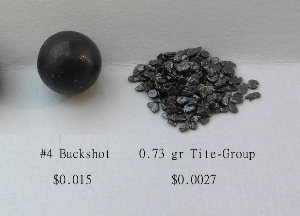 The
rifle can accept a number of projectiles, including pre-swaged #3 and #4 buckshot, .22 short slugs from North
American Arms and heavy Eun Jin airgun pellets. The heavy airgun pellets seemed marginally more accurate (at
lower velocities), similar to what I found in my modular muzzleloader project. However, the plain #4 buckshot performed well
enough for plinking, and were much easier to load - not to mention cheaper. The cost per shot is less than two
cents and is almost entirely due to the cost of buckshot. If one had the time or inclination to cast their own, you could shoot
for less than a cent a shot!
Follow-Up
So far, this rifle has launched almost ten pounds of #4 buckshot into a large assortment of targets with very
few problems. As far as the non-ammo 'disposables', I really don't monitor battery life very closely,
but my guess is over 300 shots/charge, and the o-ring breech seal does not seem to degrade as long as the
headspace is correct. I can't discern any igniter tip wear, although it must have a finite lifespan as a tiny
amount of electrode material is sputtered off with each shot, but if it had to be replaced within 10,000 shots, I
would be surprised.
This project was such a success that I expanded the general design principle to build a repeating pistol, which
can be seen here as the 'Lorenzoni-Girandoni Pistol'
Detailed plans
For those who might want to replicate some of this work, I am making available a set of 3-D CAD and other files for the major parts of the gun. A set of drawings of the parts in pdf format can be found here. If someone wants other file formats, they may contact me here:Contact Webmaster. The power supply construction is covered in a separate web page here
Subsequent Modifications
Ceramic or Plastic?
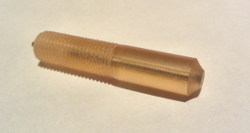
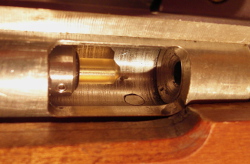 [May, 2014] The most 'fiddly' part of the project, especially for those not
used to handling such material, was making the ceramic/steel igniter tip. I am always looking for a simpler way
to make it, and one day I ran across the plastic Radel, which is a high-temperature polysulfone with a shear strength approaching
stainless steel. It is very slightly flexible but can be easily machined with standard tools. To test it, a
0.25" Radel rod was obtained from McMaster-Carr
and machined into a duplicate of the igniter shown above. It was drilled to receive a 17ga stainless hypodernic
tube, closed at the tip and press fit into a drilled hole. So far, I have shot a few hundred rounds with it, and
although there is a small amount of tip erosion, it still functions well. When it fails, it will be re-make it
with a small stainless steel sheath at the very tip to reduce gas cutting. The tip shown took me just a few
minuted to make, as opposed to a few hours fabricating the ceramic one, so unless some other problems turn up,
this will be the new default igniter for my e-gun projects.
Let's have a PEEK at the problem...
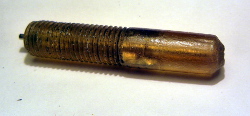
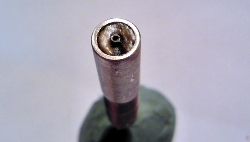 [June, 2014] After a few hundred more shots, including a
dozen with high-power loads, the Radel igniter was pulled, and the condition can be seen in the picture to the
left. There was the expected surface erosion, especially severe on the tip where the arc originated, but there
was also internal cracking, most likely due to the higher-power shots. The tip was re-made, this time using a
PEEK plastic slug inside a steel framework. After a hundred or so shots, it was also removed for inspection as
seen on the right. Even though PEEK can withstand higher temperture than the Radel, it too was badly eroded and
beginning to misfire.
Back to basics
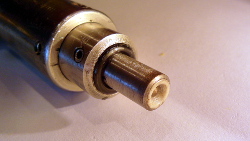 [July, 2014]A new ZTA ceramic tip was made, this time
with a slightly recessed cavity to assist ignition. After a hundred or so shots, it looks brand new, and I
suspect it should last for thousands of shots - at least. I'm sorry the plastic substitutes didn't work,
but they were well worth a try.
Better Ammunition
One of the things that was slightly disappointing about this rifle is that it did not group as well as I wished. To see if a different shot material would help, I molded some #4 buckshot using the LEE 18-cavity mould, making shot from both pure lead and 15% tin alloy. Interestingly, although the pellets were not all perfectly round, in general, both performed better than the commercial Hornady buckshot, with the alloy version grouping significantly tighter. Theorizing that the Hornady buckshot hardness might be variable, I annealed the shot at 375 degrees for two hours and let it cool slowly over the course of an hour. The shot did soften as measured by hammer-drop compression, so it was lubricated with a paraffin coating and shot from a sand bag rest at 25 yards using a red-dot sight. The result was the group below (the divisions are one inch). There was an occasional flyer, but this is as accurate as I could ever expect and as good as I can do with those sights.


